
Want to redirect your 404 page to your WordPress homepage?
Redirecting 404 pages that are not found from your site to the home page can reduce the bounce rate and allow users to find useful content on your site.
See Also: How to Change the Link Color in WordPress
In this article, you will learn how to redirect 404 pages to your WordPress homepage..
How to redirect 404 pages to your home page in WordPress
Why redirect your 404 Page on WordPress to Your WordPress Home Page
You don’t need to create a custom URL page. Instead, redirect your visitors to the home page.
WordPress will redirect a user to a page that doesn’t exist on their website if they request it.
Default WordPress 404 page
Most people who land on the default 404 pages leave your site within minutes. This can increase your bounce rate and negatively impact your search engine rankings.
A redirection to a relevant page can help you keep your users engaged. Some website owners take the shortcut and direct users to the homepage.
You’ll redirect specific errors to the most relevant page in the ideal world.
We’ll demonstrate two ways to redirect 404 pages to the home page, as well as custom pages within WordPress.
Method 1 – Redirect all 404 pages in WordPress to the home page
This code snippet is used to redirect all pages 404 to the homepage. See method 2 for details on how to redirect individual page 404 pages to other relevant pages.
You’ll need to add code in your WordPress files to complete this process. If this is the first time you’ve done it, check out our guide for beginners on how to insert code from the web into WordPress.
First, create a new file within your WordPress theme folder. Give it the name 404.php. If you already have a 404.php template, you will need to edit it.
You need to connect with your WordPress hosting account via an FTP client or file manager to make this editable.
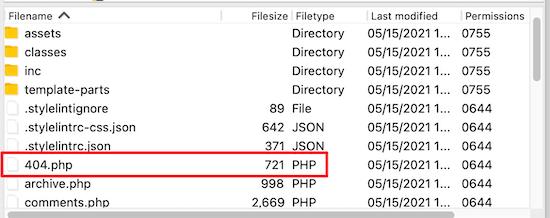
Once you have connected to your site, you will see your 404.php in your WordPress themes.
In your 404.php, add the following code:
<?phpheader("HTTP/1.1 301 Moved Permanently");header("Location: ".get_bloginfo('url'));exit();?>
Next, you will need to save the PHP file and reupload them to your theme directory via FTP.
When a page is not found they will be shown a 404 page instead.
Method 2 – Use AIOSEO in order to create custom 404 pages redirects within WordPress
Redirecting 404 error pages to the most relevant page (not your homepage) is the best and most SEO-friendly way to deal with them.
All in One SEO plug-in is perfect for this purpose. It is the best WordPress plugin. This plugin has been downloaded by over 2,000,000 websites.
See Also: How to Add Drop Caps in WordPress Posts
Their Redirects feature allows you to track all 404 errors and set up intelligent 404 page redirects in WordPress.
First, install and activate AIOSEO. See our step-by–step guide on how to install WordPress plugins.
Notice: All in One has a free SEO version. We’ll use it, however, since Redirect is an addon.
Once the plugin is activated you can go to All In One SEO >> Referrals. If redirects have not been set up yet, click the button to activate them.

Once you’ve done all that, you can click on the Settings> menu item and enable logs 404.
Next scroll down to the Logs section. Then click the?404 Logs? toggle. It will turn blue.
Your 404 logs include a list URLs that your visitors have attempted to use in order to visit pages that do not exist on your website.
Select the time period you would like the plugin to keep track of by using the drop-down menu.
Before you continue, make sure that you click Save Changes.
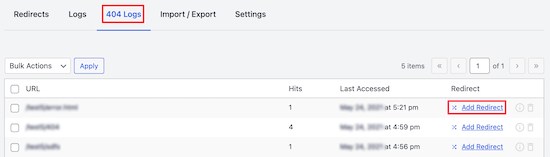
Next, click the ‘404 Logs’ menu option to display the last visited 404 page. Keep in mind, it might not immediately display anything because you just enabled log-in. To see more insights, it may take up 24 hours.
Click on the 404 logs Menu option
The URL column will reveal the URL page that was visited by the user. You will need to click on the Add Redirect’ link within the Redirect column.
This will bring up a dropdown from which you can enter the redirect information.
For the best results, type the URL to the query you are trying to resolve in the Target URL box. Then click “Add Redirect” to send it to us.

If, for example, you had a tutorial how to set up a WordPress blog, and then deleted it and created a new one with the same instructions, it would be a good idea to redirect that URL to your new blog post, rather than to your homepage.
Simply follow these steps to add multiple pages redirects to your 404 page.
Keep in mind that you don’t want to constantly redirect your 404 page from your home page. It works temporarily, but you should create a new 404 page to convert users or redirect them to a more relevant one.
We hope this article helped to show you how to redirect a 404 page in WordPress. You might also be interested in our guide on the best drag-and drop WordPress page builders to create custom, 404 pages as well our expert picks regarding the most essential WordPress plugins and services for businesses.
excellent blogs mate keep uploading more good luck !!
I really thank full to you. My site here after won’t get crawl error.