The easiest way to store or share images from websites, programs, and video games is to learn how to screenshot Windows. In just a few simple clicks, you can save it to your computer and send it via email, social networks, or file-sharing websites.
You will learn how to screen-capture websites or program screens and full-screen video game displays using many different methods. Not only will you learn to take static screenshots and record videos, but now also.
Also, we’ll explore screenshotting differences between Windows 10 and Windows 10.
What exactly is a screenshot?
To begin with, precisely what is a snapshot? Taking a screenshot using your computer, phone, or tablet is possible. A graphics file is created to store the image. Screenshots may be captured using various software programs or specific keyboard shortcuts.
Windows 10 – How to make a screenshot: Easy tips
These methods will show you how to use Windows screenshots to grab full or minimalized screenshots.
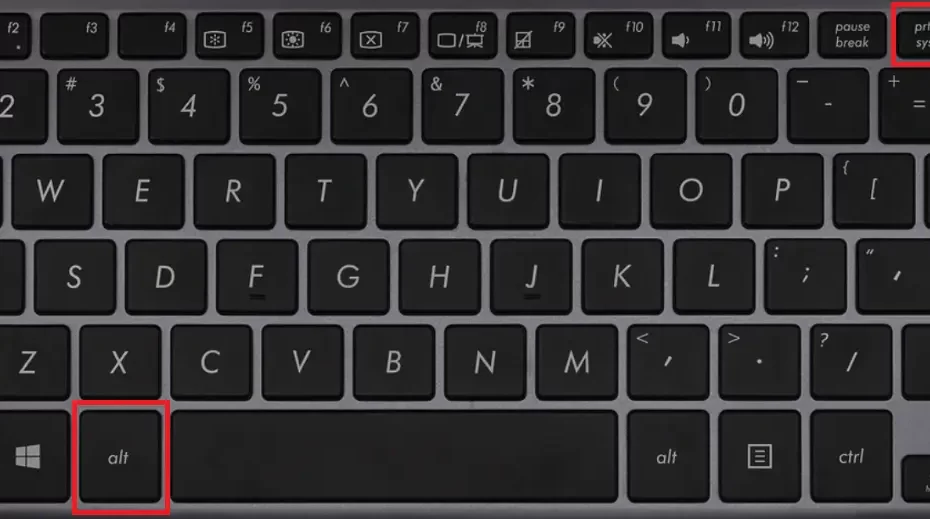
To take a reduced or full-screen screenshot, press the print key.
Windows OS: Full or reduced screenshots by using the game bar.
Capture screen using Alt + Prt S (print screen button).
Windows + Print Screen screen capture
Snipping Tool can be used to create a Windows screenshot.
Taking a screenshot using the Snip & Sketch application
You can capture PC screenshots using an image editing program or third-party software.
Windows Key + PrintScreen Key
This method will take a snapshot of your whole screen and automatically save it to the Pictures folder on your computer. You can use this tool in the following way:
1. Press Windows Key + Printscreen key simultaneously.
2. In your Pictures directory, you should find a new subfolder called “Screenshots.” You should save your screenshot there, with a name that contains the date and hour it was captured.
If you need to grab a screenshot quickly, this is the way to go—no need to use image editing software. You can’t control which portion of the screen to take a screenshot.
Windows 10 Snip & Sketch Tool
Snip & Sketch can be used to create a screenshot on Windows 10. This app is accessible through Start or a keyboard shortcut.
How do I use it?
First, go to the site or window where you want to take a screenshot. You can use the keyboard shortcut Win+ Shift+S or select the Start button from the Taskbar. Type Snip&Sketch and tap it.
When the tool is opened, it will show you many icon options.
Freeform: Draw a custom shape for a screenshot.
Rectangle: You can capture a screenshot by dragging a rectangle with the mouse.
Full-screen Snip is a screenshot of your entire screen or screens from multiple monitors if you have more than one.
Window Snip This mode allows you to capture only the screenshots of open windows.
You can close this tool by tapping on X if your selection changes.
Step 3: Once the screenshot has been captured, it will automatically be copied to your clipboard. It will be available as a notification on your screen. It is possible to share/markup files by simply tapping them.
Step 4: If you do not see the popup, click the Notifications icon at the upper right-hand corner to open the Snip & Sketch application.
Step 5: To cut down the screen size, you can save the Paint file. After saving the file, you can now reduce its size.
How to Use the Snipping Tool
Windows has a Snipping Tool allowing you to screenshot a particular area. You can use this tool in the following ways:
1. Enter “Snipping Tool,” followed by the desired result, into your search bar.
2. You can start another snip by clicking “New.”
3. Click on the screen area you wish to capture.
4. When you click on the selected area, a window will pop up with the cut.
5. The image can be saved by clicking “File,” “Save As,” or “Save the Image.”
Snipping can select a section or window on your computer screen. This tool allows you to highlight or annotate before saving your selected area.
Windows + G gaming
When playing a Windows 10 video game, you can take screenshots or record the gameplay using the Game Bar. This is how you can use it.
1. Windows + G will open up the Game Bar.
2. You can take screenshots by clicking on the camera.
Find a folder called Captures in the Videos folder. Your screenshots should be saved with a filename that includes the date and hour it was captured there.
Game Bar lets you take gameplay clips or screenshots while playing a Windows 10 video game. This only works in games.
Windows 11 Tips: How to Take Screenshots
After loading an image in Snipping Tool, you can crop it and specify which portion to keep—no need to recreate the screenshot.
The screenshot can sometimes show colors or shapes if the desktop wallpaper contains them. If you set the wallpaper to all white, this will not happen.
You can add an outline to your Snipping-Tool screenshots by enabling Snip outline in the Snipping-Tool settings. The border can be any color.
Sizer is a free utility that resizes windows to meet specific requirements for height and width before you take a snapshot.
For this purpose, there are many screenshot apps available. For increased functionality, you may want to consider a separate app. For example, a screenshot application allows you to capture an entire website, which is impossible with the previous steps.
Many people are interested in the conclusion of this article.
Our article covers how to create a screenshot on Windows of multiple versions.
Let’s compare taking a screenshot on Windows 10 with one on Windows 7 or 8. We can see that the key combination and primary method are identical, despite the differences between the versions of Windows. However, the tools for editing images and where they appear on the desktop differ.
I hope this article has answered all your questions about creating a Windows screenshot. This article can be used as a resource by users who want to explore the exciting world of screenshots.